Art of visualizing data

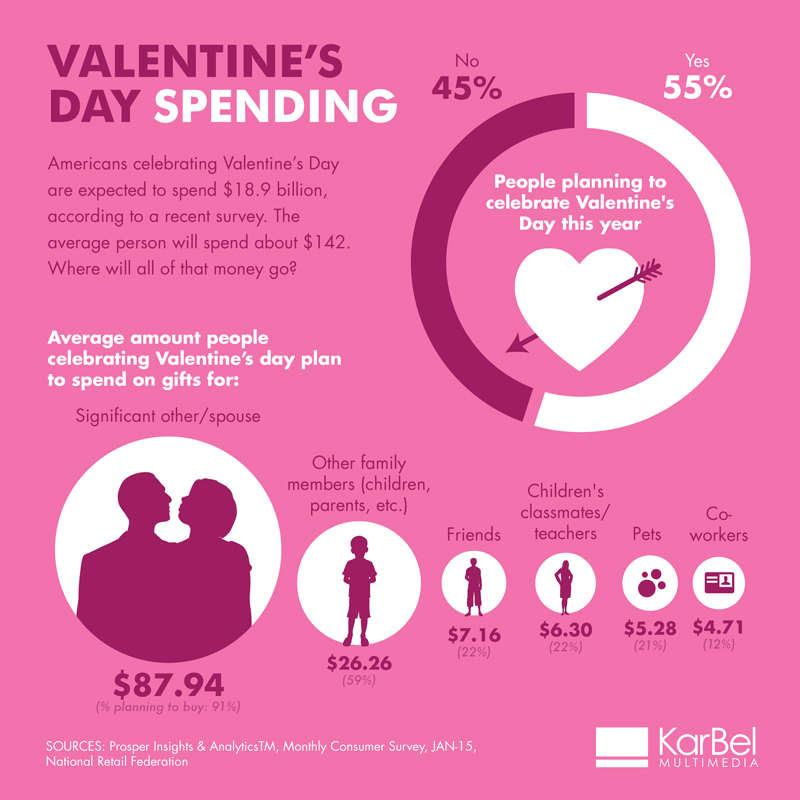
Every new visualization is likely to give us some insights into our data. Some of those insights might be already known (but perhaps not yet proven) while other insights might be completely new or even surprising to us. Some new insights might mean the beginning of a story, while others could just be the result of errors in the data, which are most likely to be found by visualizing the data.

What can you do to get more actionable insights from your data?

Analyze and interpret data:  Learn something from the picture you created. You could ask yourself: What can I see in this image? Is it what I expected? Are there any interesting patterns? What does this mean in the context of the data?Sometimes you might end up with visualization that, in spite of its beauty, might seem to tell you nothing of interest about your data. But there is almost always something that you can learn from any visualization.

Document your insight and steps: I really think that the documentation is the most important step of the process; and it is also the one we’re most likely to tend to skip. It’s a good idea to start the documentation by writing down these initial thoughts. This helps us to identify our bias and reduces the risk of mis-interpretation of the data by just finding what we originally wanted to find.

Transform Data: Aesthetics are important when it comes to data visualization, but this doesn’t mean that the graphs and charts need to have a ton of colors and effects. Here, we can subscribe to the old adage that “less is more.” Less may be more, but that doesn’t mean you should completely forgo any effects. Play around with one or two effects to see what best represents your data or most helps the viewer understand the data.

Have Someone Else Take a Look: Even if you’re pretty clear on what you’re seeing, get another set of eyes to take a look at your charts and graphs; one person can’t always see everything. You’ll get clean and clear insights as to what your data is saying.

Double-Check Your Data: Be skeptical with your data. Question what you’re seeing and look at it in as many different ways as possible to make sure you are understanding it correctly and interpreting it how someone else might see it. You don’t want to unintentionally mislead anyone, and you certainly don’t want to intentionally deceive.

There’s a lot you can do with visualizing data, but the real artistry comes in displaying it in such a way that brilliant, actionable insights emerge where they weren’t previously visible.

Sources: https://datahero.com/blog/2015/02/26/art-visualizing-data-find-actionable-insights/

http://datajournalismhandbook.org/1.0/en/understanding_data_7.html

 http://www.scribblelive.com/blog/2014/07/18/self-verifiable-visualizations/

Parameters and Filters in Tableau: When to use them

Global Quick Filters

Global quick filters are very useful when creating dashboards that contain worksheets that all use the same data source. For example, in a dashboard that displays the dataset in both text and visual forms, global quick filters give the flexibility to present the filter in a variety of formats: single value dropdown, multiple values list, wildcard match, etc. They also allow the user to show an aggregation of all marks with the “(All)” filter.

Disadvantage of global quick filters is that if the analyst has a dashboard with worksheets that each use a different data source, they do not work.

Filter Actions

Filter actions are best used when the user should interact with a specific sheet that acts as the “control. A filter acts directly on a dimension or measure and restricts the domain of the field.

There are a lot of options for filters. You can include or exclude members of a dimension, use a wildcard for the member name, choose the top N, given another measure, or use an condition (essentially a true/false calculation) to choose what is in and what is out. You have a fair number of UI options for filters: radio buttons, check boxes, drop down lists, sliders, and more. On top of that, you can choose what sheets the filter applies to.

Parameters:

Parameters are more powerful and more complex. A parameter, is like a variableYou can then use that variable inside calculations to change the calculation. If you filter by a calculated field, you essentially have a parameter controlling a filter. Parameters have almost the same UI options as filters, but they are single valued, so you have options for radio buttons, but not check boxes. There are also sliders and drop downs. Parameters are global, so can affect calculations for all data sources and connections in a workbook.

Unfortunately, parameters have their own limitations. Whereas global quick filters have seven ways to be represented on a dashboard, parameters only have four. Parameters cannot make multiple selections in a filter, e.g., with a list of checkboxes, and they do not have the “(All)” aggregate choice of quick filters. While the inability to select multiple items in a filter cannot be circumvented, the data can be structured to include an “All” row that aggregates the relevant data for that mark. This is not optimal, since the analyst must make this consideration when preparing their data for use in Tableau, but it is the only workaround we have come across.

Sources:

http://stevensanne.com/tableau-tutorial-3-filters-and-parameters/

http://www.wmanalytics.io/blog/filters-and-parameters-tableau-when-use-them

https://community.tableau.com/thread/144158


In God we trust, all others must bring data

We all are facing different issues while completing our projects. I experienced myself losing an argument with professor because either the veracity of the data, where it came from, or how it was collected was called into question. Hence my data or my conclusions were not trusted. I learned that if I ever present arguments, back it up with data not story.

Hence after professor suggestions I made sure to have done my homework. That way, I can address any questions about data with confidence. Trust on correct data to consistently deliver meaningful, relevant results based on evidence and fact. Here are the tips in how to present data in era of alternate facts:

  1. Be impartial: Try not to have preconceived notions about what the data should show or how it should be interpreted in advance. If you go into an analysis without an agenda and present your results as objectively as possible, it won’t seem like your analysis takes a side or pushes a particular point of view.
  2. Provide Context: No analysis is done in a vacuum. There’s always a reason for conducting it, as well as a plethora of factors that go into what data is used, where the data comes from and the methodology you choose to approach it.
  3. Obsess over accuracy: Put yourself in the shoes of your audience and try to question your numbers the way they would question them. Does everything add up? Does everything make sense? Yes? Good. Now bounce your analysis off someone else for one final review before you take it to present.
  4. Admit your mistakes:Honesty is always the best policy, with no exceptions. If being accurate helps build trust, admitting it when you’re not reaps similar rewards. You will get far more respect for owning up when you are wrong than if you cover it up and are caught.
  5. Be Thoughtful About How, What and When To Communicate : How, what and when you communicate can have a major impact on how trustworthy you are perceived to be, too.  On what you communicate, it is important to know your audience and explain yourself clearly in terms they will understand. Talking too much or being long-winded can turn people off and be a sign that you don’t listen.

Source: https://www.linkedin.com/pulse/how-present-data-executives-era-alternate-facts-hint-aaron-maass?trk=v-feed&lipi=urn%3Ali%3Apage%3Ad_flagship3_search_srp_content%3BK45zLsFN7bdjFYCdvXf6pw%3D%3D

Knowing your audience is the key

Last week we were struggling to create interactive visualization for the audience of our choice. Many of us experienced the difficulty of choosing the audience. But once our user was fixed,  we forgot about the audience while creating the visualization and were more focused towards creating some interactivity in our Dashboards.

Audience plays most important role in any visualization. The best visualizations don’t make your audience work too hard to understand them. Showing your readers the actual data and explaining what it exactly means will increase their comprehension and will encourage them to spend more time with your data, amplifying its effect. Following points will help us to enhance our analytics skills and ability to approach any data.

It is important to match your visualization to your viewer’s information needs. You should always be asking yourself: “What are they looking for?”

1. Understand your audience before designing your visualization

What type of decisions do your viewers make? What information do they already have available? What additional information can your charts provide? Do they have time (and interest) to explore an interactive website, or should you design a one-page handout that can be understood at a glance?

2. Your audience determines the type of visualization you prepare

Spend some time thinking about your dissemination format before you sit down at the computer to design your visualization. Give a glance at what viewers what, it can be visual reports, executive summaries, live presentations, handouts, online reporting and more.

3. Remember that the key is to keep your audience engaged

Ensure that your audience is looking where you want, when you want. Keep it simple but at the same time it should be informative enough to engage your audience in visualization without any confusions.


Sources:

Why Your Audience Matters in Data Visualization

https://www.maptive.com/use-data-visualizations-win-audience/


Valentine’s Day spending by Americans

The most loving day of the year was celebrated this week: Valentines Day. The spending on cards, overpriced flowers, chocolates, chilling champagne and the fantastically romantic dinner date is done. Lets just get a sense of  how expensive Valentine’s Day can get. Below visualization depicts the Valentines Day spending by Americans. 

What I like about this Visualization is

  • Color that matches the theme
  • Precise titles show what we are about to see
  • Nice description which shows us the goal
  • Donut chart works well here as it’s only 2 slices

Possible improvements:

But to reach our goal and take proper action, there is very little context. We cannot figure out if this spending is increasing or decreasing as compared to previous years. Historical spending’s might help in getting a proper picture.

As discussed in class regarding grouping the significant attributes which does not have much difference amongst them, we could make two groups: significant other and everyone else.

Use of bubble charts to compare the sizes of the spending could be replaced by a simple bar graph. It will be easier to read. Though the color matches the theme but this is a lot of pink.

The data seems incomplete since it only shows spending on gifts but not the other expenses of flowers, chocolates, holiday, dinner etc. which are overpriced during Valentine’s Day.

I felt the below link depiction of Valentine’s Day spending to be better and simple:

https://nrf.com/resources/consumer-data/valentines-day

But overall we can say that love is not likely to be a cheap thrill on Valentine’s Day.

Sources:

http://www.karbelmultimedia.com/2015/02/valentines-day-spending-infographic/

https://nrf.com/media/press-releases/cupid-shower-americans-jewelry-candy-this-valentines-day


Dive into Tableau Calculated Fields

Last week, we discussed in the class of how to simplify complex visualizations in Tableau by creating new data from existing data through calculated fields.

Though it is best to prepare our data as much as possible before it gets to Tableau, there are many reasons to leverage the calculated fields functionality in Tableau. Few of them are:

  • To segment your data in new ways on the fly
  • To prove a concept such as a new dimension or measure before making it a permanent field in the underlying data
  • To filter out unwanted results for better analyses
  • To take advantage of the power of parameters, putting choice in the hands of your end users
  • To calculate ratios across many different variables in Tableau, saving valuable database processing and storage resources

As we know it is important to understand the data before making any visualizations. Understanding the data also includes knowing the nature of the data based on which we can decide in which family of calculation our data belong. There are three major families of calculated fields in Tableau:

Non-aggregate calculations 

These are the simplest type of calculation. Non-aggregate calculations are performed for each row in the underlying data, rather than being performed on aggregated data (such as you would find in a pivot table or Tableau view).

It is a calculated field which does not use any functions from the ‘Aggregation’ function group. For example: [Sales] – [Cost] would be a non-aggregated calculation.

Aggregate calculations

Aggregate calculations are those that use aggregate functions.  Examples of aggregate functions are SUM, AVG, MAX & MIN (there are a few others). Therefore an example of an aggregate calculation would be: Profit Ratio = SUM(Profit) / SUM(Sales).

When we drag and drop a measure in Tableau, it is automatically aggregated. The default is sum. The primary difference between aggregate and non-aggregate calculations is that aggregate calculations often can’t be sensibly calculated for each row in the underlying data set – it normally only makes sense to calculate them when the data is aggregated.

Table calculations:

Table calculations allows us to compare two or more separate measures in our data set, it allows us to compare a singular measure to itself (the only way to compare a measure against itself).  These are the calculations which are applied to the values in the entire table. For example, for calculating a running total or running average we need to apply a single method of calculation to an entire column. Such calculations cannot be performed on some selected rows.

When writing any calculation, make sure to know exactly what you want to do. There are many functions and table calculations within the powerhouse of Tableau which can be utilized to create the calculated fields for presentation of data in a pictorial or graphical format. Keep exploring. Keep learning.

Sources:

http://www.clearlyandsimply.com/clearly_and_simply/2010/10/calculated-fields-in-tableau.html

https://www.tableau.com/about/blog/2017/2/top-10-tableau-table-calculations-65417

Tableau Fundamentals: An Introduction to Calculated Fields


Playing with data to get different interpretations

Last month we created the visualization to depict the daily volume of speed violations that have occurred in Children’s Safety Zones for each camera in Chicago. I tried to see number of violations in each area in Chicago from 2014 to 2016.

There were few areas where the speed violations were massive as compared to other areas. Those speed violations kept on increasing in higher numbers for next year. Also there are areas like “4843 W Fullerton” where number speed violations increased from 2014 to 2015 by 82211 but in 2016 it decreased by 15843 which shows us the efforts of the traffic police department to decrease the speed violations.

Below is the link which shows the changes in amount of violations in Chicago from 2014 to 2015 and from 2015 to 2016.

https://drive.google.com/open?id=0B8ffu231haBVeHdkYVo0d1YzdDA

In order to get the picture of increase and decrease in number of speed violations in every area following steps were carried out on Tableau:

  1. Get the number of speed violations separately for each year based on Violation Date field. To get only the number of speed violations for particular year, I took three calculated fields each consisting the violations of year 2014, 2015 and 2016.
  2. To achieve this from violation date I extracted only year using YEAR function. For example to get the number of speed violations for year 2014, Violations_2014 calculated field was created with code:  If YEAR([Violation Date]) == 2014 THEN [Violations] END.
  3. Once we have the amount of speed violations for each year separately then we can take the difference between any 2 years to get the depiction of increase or decrease in the number of speed violations.
  4. To see the amount of increase and decrease in year 2015, we can create calculated field as Difference_2015 with code: SUM([Violations_2015]) – SUM([Violations_2014])
  5. Step 4 is to be repeated to get the change in speed violations for year 2016 with code: SUM([Violations_2016]) – SUM([Violations_2015])
  6. Once we have the amount of change in speed violations for each year we can plot the graph with the Address field on Y-axis and change in speed violations on X-axis.

This can be done in different ways in Tableau. I followed this approach to get the detailed step by step understanding of the data. Your comments are welcome for any alternate or better approaches to get the same visualization.

Cherry-picked data

There are several data collections on Mass Shooting. All of the data defines mass shooting in different ways. Some only count incidents where four or more people were killed, others count any where four or more people were shot (whether they died or survived). The problem is that, depending on the criteria, the number of mass shootings that take place each year can range from dozens to hundreds.

As per the story published in Truth Stream Media “Why Have There Been More Mass Shootings Under Obama than the Four Previous Presidents Combined?”, they represented following graph:

It included the following chart, which it said was based on several data sources. One was the Mother Jones database on mass shootings, which uses the four-killed-or-more criteria. Two others were from Wikipedia.

Based on the data collected form different sources, the truth was misrepresented. Cherry picked data gives incorrect representation of data and misleads audience with the facts.

Below is the reality for number of shootings by presidential terms using only the data from the same database:

https://www.theatlas.com/charts/41Y3HT7Ux


Source: http://truthstreammedia.com/2015/12/02/why-have-there-been-more-mass-shootings-under-obama-than-the-four-previous-presidents-combined/

US Mass Shootings, 1982–2023: Data From Mother Jones’ Investigation

https://qz.com/580859/the-most-misleading-charts-of-2015-fixed/

Just a pretty picture

twitter


The pie chart in the image above reflects 100 most active Tweeters. The chart is neither conveying the information which it claims to nor is appealing to explore the information presented. The colors used to spread the data information makes it attractive and pretty. But representing the top 100 of anything and especially in the pie chart is always a bad idea. Plus the colors are spread out in smaller to smaller wedges making this visualization more like a puzzle to match the colors.

Also I think the data lacks with the percentage share. It would be better to limit such analysis to top 20 users with bubble or gantt chart. While using pie charts its better to limit pie wedges to maximum 6.

Source: http://chandoo.org/wp/2009/08/28/nightmarish-pie-charts/

Track your wedding

Screen Shot 2017-01-21 at 8.34.40 PM

Weddings are significant events in people’s lives and as such, couples are often willing to spend considerable amount of money to ensure that their weddings are well-organized. The most initial planning includes list of guests to be invited based on the budget finalized in which lot of documentation and paperwork is required. While preparing budget and proceeding with preparations this work can get more complicated.

My Wedding RSVP Status dashboard which can be created easily can help to track quickly how many people are coming, who they’re associated with, gifts received, thank you cards sent, summary cost information and more. When we update the lists dashboard can automatically reflect the changes.

I really loved this simple yet powerful dashboard which can help us to plan wedding appropriately and proceed with the preparations.The visualization above will help in order to make key decisions. Few examples of decision making based on this dashboards can be:

  1. How many people are yet to RSVP and number of people who responded with may be. We can follow up with those people to confirm there presence.
  2. Number of children attending the wedding so that the food preparations can be taken care of.
  3. The estimated expenses of the functions to be held. If the expenses are manageable or below the budget then we can think of inviting more number of people which were left because of the budget constraints.
  4. Count of number guests accepted based on relations to the bride and groom.
  5. Number of thank you cards we are yet to send for the gifts received.

Such dashboards ease our life and help us to organize the most memorable events of our lives in a more organized and efficient way.

Source: http://www.spreadsheetshoppe.com/wedding-rsvp-tracker-template/